
This tutorial will help you make a simple circle frame
I am using photoshop elements 9.

I usually choose a:
20cm by 20 cm window
with 300 pixels per inch
RGB color
and a transparent background.
Then click ok.
Its nice to get started on something new :)
If you already have a piece of ribbon that you like open it up in this new window. I open my pictures file and drag and drop the picture into photoshop. If you don't have any ribbon don't worry, this tut is about the technique so using your marquis tool make a long rectangle across the screen like this and fill with any color.

 There you wil get a drop down menu. Click on rotate and another menu comes out. Go down to rotate 180 degrees and click on that. Your ribbon will now be upside down. This is necesary as when turning the ribbon into a circle the ends go upwards leaving the design inside. So your ribbon or rectangle of color is now at the bottom of your screen. And if you have a ribbon it is upside down.
The next thing you need to consider is that when turning your ribbon into a circle it will become stretched and therefore thinner. If you have a recognisable pattern on your ribbon it may look squashed. To counteract that it is advisable to use your move tool. Click on your ribbon and drag it upwards to make it thicker.
 So now you have this, your ribbon is at the bottom of the page and is is stretched thicker. Is this thick enough? you may be asking now. Well I don't know yet, you have to wait for the magic...be patient :)
Now comes the fun bit, go to the top of the page and look for filter its not in red but it is the 7th button in on the top row. Its where lots of the fun things are stored. When you get used to photoshop elements you will be playing around in this area for sure. Another drop down menu will come out. Look down the row and you will see distort, click on that and another drop down comes out (it's like a sweetie shop you just don't know it yet) and this time find polar coordinates and click on that.
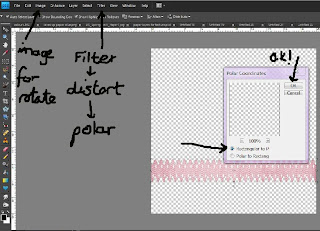
I hope the picture I have uploaded is clear enough. It shows you where image is for the rotate and it shows you where filter is. Once you have done this you will get this box showing. Click in the first dot which is rectangular and then click ok.
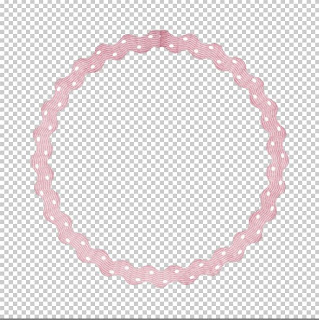
Now hopefully the magic should happen and your ribbon or rectangle should look like this and you will be jumping up and down and clapping your hands.
Maybe tho it doesnt so quick trouble shoot.
1 It looks squashed: no worries click the control button and the z button to undo the last move. Drag the ribbon wider and then redo the polar coordinates.
2 my ribbon is too thick: okay as above undo the last move but make the ribbon thinner and then redo polar coordinates.
3 There is a gap at the top of my frame: this is because the ribbon wasn't fully touching both sides, sometimes its really hard to see little gaps but undo the polar coordinates and enlarge the ribbon until it definately touches... but no more.
4. The join at the top is obvious or the pattern doesn't match...ok whoa there we are just getting started and nothing is perfect. If it is really obvious there are a few things you can do.
Firstly use the image and rotate 180 degrees so the join is at the bottom and place other decorations on top da da! That is cheating I know but if you have just got started you may want to have a rest now :)
 Secondly if you are a little more advanced use the clone tool on the left hand side halfway down to match the pieces together. Click on the clone tool. Make sure the brush is the right size ie small enough, then click the piece you are going to clone and press the alt button at the same time then click on the join and run the brush down. It takes a bit of practice but it is very effective. Look the obvious join is gone.
5. My pattern is upside down. You forgot to turn your ribbon upside down before you did polar coordinate. Undo the polar coordinate and turn your ribbon 180 degrees.
So now you have a perfect circle frame ...whats that? You don't? well if it is not a perfect circle it is because the page was not an equal square so go back and check.
 Right now you have a perfect circle. Well done. Just think of all the things you can do now you know how to do this!
This is one of my frames. I hear you going whoa nelly how the heck? But it really is all done using this technique and then just layering. In this frame there are three layers of lace ribbon. One layer of curled paper ribbon. One layer of pearl beads, again just do it exactly the same way stretch or reduce until the beads look perfectly round. Then put them all on top of one another. Make larger or smaller as required and don't forget that you can hold down control and click on all the layers, then go to the top and click on the align button. Found when you are using move and align away, centre horizontal and vertical.
Are you feeling creative? I hope you are and will get good use out of this tutorial. Please leave me feedback to let me know if there is anything confusing.
Good luck
Claire :)
If you already have a piece of ribbon that you like open it up in this new window. I open my pictures file and drag and drop the picture into photoshop. If you don't have any ribbon don't worry, this tut is about the technique so using your marquis tool make a long rectangle across the screen like this and fill with any color.

Make sure your ribbon goes right across from one side to the other with no gaps at all. Now take your ribbon down the page to about 2/3rds from the bottom. If you have a pattern on your ribbon which is obviously one way up only click on the image tab which is 3rd from the left top most button.
 There you wil get a drop down menu. Click on rotate and another menu comes out. Go down to rotate 180 degrees and click on that. Your ribbon will now be upside down. This is necesary as when turning the ribbon into a circle the ends go upwards leaving the design inside. So your ribbon or rectangle of color is now at the bottom of your screen. And if you have a ribbon it is upside down.
 The next thing you need to consider is that when turning your ribbon into a circle it will become stretched and therefore thinner. If you have a recognisable pattern on your ribbon it may look squashed. To counteract that it is advisable to use your move tool. Click on your ribbon and drag it upwards to make it thicker.
 So now you have this, your ribbon is at the bottom of the page and is is stretched thicker. Is this thick enough? you may be asking now. Well I don't know yet, you have to wait for the magic...be patient :)
Now comes the fun bit, go to the top of the page and look for filter its not in red but it is the 7th button in on the top row. Its where lots of the fun things are stored. When you get used to photoshop elements you will be playing around in this area for sure. Another drop down menu will come out. Look down the row and you will see distort, click on that and another drop down comes out (it's like a sweetie shop you just don't know it yet) and this time find polar coordinates and click on that.

I hope the picture I have uploaded is clear enough. It shows you where image is for the rotate and it shows you where filter is. Once you have done this you will get this box showing. Click in the first dot which is rectangular and then click ok.

Now hopefully the magic should happen and your ribbon or rectangle should look like this and you will be jumping up and down and clapping your hands.
Maybe tho it doesnt so quick trouble shoot.
1 It looks squashed: no worries click the control button and the z button to undo the last move. Drag the ribbon wider and then redo the polar coordinates.
2 my ribbon is too thick: okay as above undo the last move but make the ribbon thinner and then redo polar coordinates.
3 There is a gap at the top of my frame: this is because the ribbon wasn't fully touching both sides, sometimes its really hard to see little gaps but undo the polar coordinates and enlarge the ribbon until it definately touches... but no more.
4. The join at the top is obvious or the pattern doesn't match...ok whoa there we are just getting started and nothing is perfect. If it is really obvious there are a few things you can do.
Firstly use the image and rotate 180 degrees so the join is at the bottom and place other decorations on top da da! That is cheating I know but if you have just got started you may want to have a rest now :)

5. My pattern is upside down. You forgot to turn your ribbon upside down before you did polar coordinate. Undo the polar coordinate and turn your ribbon 180 degrees.
So now you have a perfect circle frame ...whats that? You don't? well if it is not a perfect circle it is because the page was not an equal square so go back and check.
 Right now you have a perfect circle. Well done. Just think of all the things you can do now you know how to do this!
 This is one of my frames. I hear you going whoa nelly how the heck? But it really is all done using this technique and then just layering. In this frame there are three layers of lace ribbon. One layer of curled paper ribbon. One layer of pearl beads, again just do it exactly the same way stretch or reduce until the beads look perfectly round. Then put them all on top of one another. Make larger or smaller as required and don't forget that you can hold down control and click on all the layers, then go to the top and click on the align button. Found when you are using move and align away, centre horizontal and vertical.
Are you feeling creative? I hope you are and will get good use out of this tutorial. Please leave me feedback to let me know if there is anything confusing.
Good luck
Claire :)
No comments:
Post a Comment